
Aston Villa – West Ham United: Aston Villa Unable To Capitalize Against Ten-Men West Ham In Entertaining Draw (0-0)
Monday night Premier League football saw a clash between Aston Villa and West Ham United. These two sides provided an absorbing back-and-forth contest throughout, despite the 0-0 scoreline.
Tactical analysis and match report by Julian Chingoma.
Dean Smith sent the hosts out in a 4-3-3 formation. There were two changes to the starters from their previous fixture. Anwar El Ghazi came in for the suspended Trézéguet at the left wing position, and Marvelous Nakamba was brought in for a fatigued Douglas Luiz in the base of the midfield. Tom Heaton continued to man the goal for Villa. The four man backline ahead of him was made up of Frédéric Guilbert, Bjorn Engels, Tyrone MIngs and Neil Taylor. Around Nakamba was the dynamic pair of Jack Grealish and John McGinn, while he attacking trio consisted of the wingers Jota Peleteiro and the aforementioned El Ghazi flanking striker Wesley.
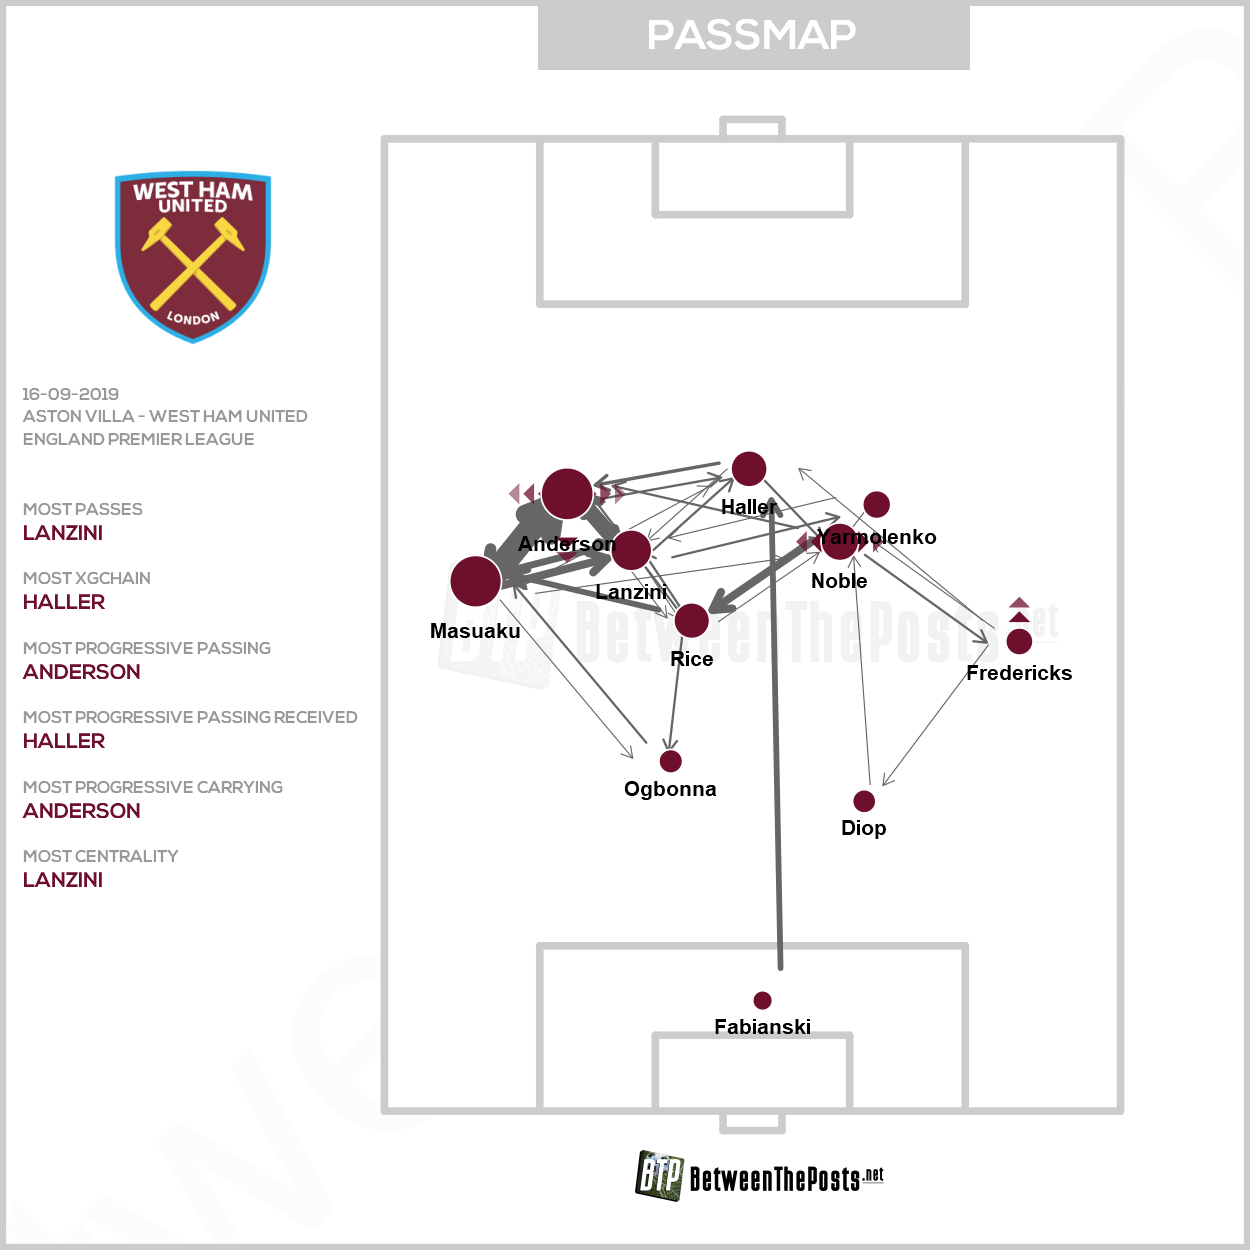
Manuel Pellegrini went with an unchanged side for this trip to Villa Park. The visitors lined up in a 4-1-4-1 formation. Their side was spearheaded by Sébastien Haller. The line of four behind him had Andriy Yarmolenko and Felipe Anderson out wide while Mark Noble and Manuel Lanzini would operate more centrally. Declan Rice would patrol the area between the midfield and defensive lines. The back four in front of Łukasz Fabiański had Ryan Fredericks and Arthur Masuaku as the fullbacks with Angelo Ogbonna and Issa Diop in central defense.
Debut night for Marvelous. 💪#AVFC #PL pic.twitter.com/qXqDQvPePv
— Aston Villa (@AVFCOfficial) September 16, 2019
Buildup play from both sides
West Ham would build with Rice dropping in, as a single pivot. Noble would switch between dropping alongside Rice and his advanced midfield position. Out of the double pivot, 4-2-3-1 is one of the most frequently occurring formations in football. The two most defensive midfielders are called a ‘double pivot’. he would be offering a passing option between the lines with Lanzini doing the same, as Rice is not much of a player that passes the ball forward.
Fredericks and Masuaku would push forward to join Anderson and Yarmolenko out wide. At times, the wingers would tuck in, to search for the ball more centrally, while the fullbacks would exploit any space the Villa fullbacks would leave if they followed them. Haller would also drop frequently when West Ham held possession, pulling Villa central defenders out of position. Yarmolenko tried multiple times to penetrate these gaps with diagonal runs from the right wing. Lanzini and Anderson had plenty of freedom to roam around the pitch, while Yarmolenko spent most of his time out on the right. They advanced the ball from midfield using the wide areas and their chances creation came mostly from crosses as a result. The combination of Anderson and Masuaku on the left was particularly dangerous.
Villa would build up with Engels and Mings at the back, and Nakamba dropping to help them progress the ball. At times, one of Grealish and McGinn dropped in as well, while the other stayed forward. The higher one would be constantly searching for space to receive the ball behind West Ham’s midfield. Taylor and Guilbert would push up, in line with Nakamba, to pin the West Ham wingers back. This capped some of the potential pressure West Ham could apply to the Villa players building up. Wesley remained in the areas amongst the West Ham central defenders while their wingers would sometimes vacate the wide areas to come and collect the ball.
Direct play
Early on, the long ball to the imposing striker was a prominent feature of both sides, however with very different results. The towering Haller was immaculate in this role. With ease, he would flick the ball onto teammates or hold it up while they moved up the pitch. Wesley, on the other hand, struggled to keep possession and often looked cumbersome when trying to hold the ball.
West Ham also used their tall winger Yarmolenko as a target for these direct balls. One of their best moments came from such a play, as Yarmolenko chested a long ball into the path of a charging Lanzini on the counterattack. He then put Anderson in behind a recovering Guilbert. The Brazilian then put in a good cross that Haller attacked but sent just wide.
Influence of the Villa midfielders
Noble would push up from the midfield line to help Haller apply the initial pressure while Villa would build up. They would try to direct the ball to the Villa fullbacks, where the could press more effectively. However, this would leave gaps in the midfield, which the gifted Villa ball-carriers -Grealish and McGinn – could exploit if found by their teammates.
 The usual positioning when Villa were building from the back.
Villa runs from midfield caused West Ham plenty of problems, especially with their high line. McGinn and Grealish would make well-timed wide runs in behind the West Ham defense to latch onto long balls while the wingers dropped to create space for them. West Ham fullbacks would also follow the Villas who would drop deep, leaving space behind them which Villa attacked using their midfielders as well as Wesley.
A clear chance they created from one of these runs was when Grealish played the ball to Jota and subsequently made a run behind Masuaku. Rice tried to track Grealish’s run but wasn’t quick enough to do so. Jota gave his teammate a through ball and the midfielder then whipped the ball in for Wesley who should have done better but could only head it wide.
West Ham were also a little vulnerable out wide. Their fullbacks had to deal with two-versus-one situations, as the attack-minded Yarmolenko and Anderson did not always provide their fullbacks with the necessary defensive support. Villa’s best first half chance came from the left wing, when Grealish once again drove out of midfield and fed El Ghazi. The Villa winger then sent in a first-time cross to find an unmarked McGinn who tested Fabianski with a great left-footed strike.
More of the same
The second half brought much of the same in terms of how the game flowed. Until the red card, that is. Masuaku got his second yellow card in the 66th minute with a foul on Ahmed El Mohamady, a substitute for Jota.
This forced Pellegrini into his second change, after previously bringing on Pablo Fornals for Yarmolenko. Pablo Zabaleta was brought on for Anderson, and West Ham organized into a 4-2-3 / 4-2-2-1 formation. Noble and Rice would be a conservative double pivot, that would shield the backline. Lanzini and Fornals would drift out to the left and right respectively.
 West Ham’s 4-2-2-1 shape once they went down to ten men.
In the closing stages, the visitors relied on the counterattack and set pieces they would win on these counters. Fornals and Lanzini would then recover to help their side defend in a 4-4-1 shape, leaving Haller up front. The visitors refused to go away as their counter caused Villa issues till the very end. The technical quality of Lanzini, Fornals and Haller meant that they could threaten with limited numbers. One breakaway which they should have scored from saw Rice involved in the final third. A striker that constantly drops deep and plays like a number ten.
He was charging forward with the ball out wide on the left hand side. The defensive midfielder managed to brilliantly get between two opponents before playing it to Haller. The striker then dummied the ball which made its way to an onrushing Fornals at the edge of the box. It was a great chance but instead of shooting, the Spaniard decided to look for a return pass to Haller which was cut out. Despite not scoring from this, it definitely illustrated the type of quality the visitors have in their attacking ranks.
Takeaways
This was an even contest where neither side were able to take control of the game for a sustained period of time. Aston Villa will certainly lament their inability to capitalize on West Ham going a man down. Masuaku’s dismissal presented a golden opportunity for them to claim a vital three points in their quest for survival. They now face a tough away trip to the Emirates to play Arsenal.
West Ham will be disappointed they couldn’t win the game but will also be pleased with their reaction after the red card. They did not fade away and allow Villa to take control but remained competitive to the end. Manchester United will welcome them to Old Trafford in their upcoming game.
Use the arrows to scroll through all available match plots.


Comments