
Aston Villa – Arsenal: Complicating The Title Race (2-1)
Unai Emery’s compact Aston Villa side overcame Arsenal’s asymmetric pressing system plus their right-sided attacks to eventually claim the three points at Villa Park. After a relatively even ninety minutes, substitute Emiliano Buendía popped up to grab the decisive goal and reduce Arsenal’s lead at the top of the Premier League.
Tactical analysis and match report by Josh Manley.
We decided to make this article free to read. If you want to support our work, consider taking a subscription.
After a poor start to the season, Aston Villa have quietly snuck their way into the Premier League top three. They came into this match on a run of seven league wins in eight games, hoping to throw a spanner into the works of league leaders Arsenal. The Gunners have been relatively imperious in the league so far this season, although they now face injury issues in their defensive line.
Unai Emery’s side started in a 4-2-3-1 system here, with a back four of Matty Cash, Ezri Konsa, Pau Torres, and Ian Maatsen. Boubacar Kamara and Amadou Onana were the central midfielders, while the attacking midfield trio consisted of John McGinn, Youri Tielemans, and Morgan Rogers. Ollie Watkins then led the line up front.
For Mikel Arteta’s side it was a 4-3-3 shape again, with Ben White, Jurriën Timber, Piero Hincapié, and Riccardo Calafiori in the backline. Martín Zubimendi, Declan Rice, and Martin Ødegaard formed the midfield three. Bukayo Saka and Eberechi Eze then started as wingers either side of Mikel Merino.
Arsenal’s asymmetric high press
One of the key aspects of the first half was the battle between Villa’s attempts to play out from their own third against Arsenal’s high press. Villa were able to find some success in this aspect, especially when they became more direct as the half progressed.
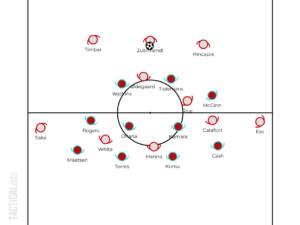
Against Villa’s 4-2-3-1 shape, Arsenal would have Merino leading the press from Konsa’s side, using his cover shadow to force Villa towards their left. Saka would then step up onto Villa’s left center-back Torres, leaving Maatsen free on the left. If the ball went into Maatsen, White would jump forward from right back, and Zubimendi, or more often Timber, would take over coverage of Rogers.

Arsenal’s high press.
In central midfield, Ødegaard and Rice would be marking Kamara and Onana, while Zubimendi swept up behind. Eze was more passive on the left, staying in line with Villa’s right back, Cash.
Villa initially tried to exploit Maatsen’s freedom on the left, with mixed success. Arsenal’s pressing plan intentionally left him free, and was designed to squeeze the ball in this area, so Arteta’s side were generally prepared for this.
As the half went on, Villa started playing more direct into Watkins and the supporting attackers. With Rogers, Tielemans, and McGinn coming into narrow positions, they often had good positioning to pick up the second balls in the spaces around Zubimendi.
Villa eventually took the lead in the first half in a sequence where they had forced Arsenal into a lower block, with Saka and Eze tracking the attacking Villa fullbacks into deep positions. Due to Saka’s deeper positioning, Torres was able to split to the left side to find space to put in an early cross towards the back post, and it found Cash who ran off the shoulder of a slightly inattentive Eze in order to put Villa 1-0 up.
Right-sided Arsenal attack
When Arsenal had the ball, there were some interesting movements and player roles. Ødegaard would usually drop into the number six zone during buildup play, with White then occupying Ødegaard’s usual advanced right halfspace position.
Arsenal often formed a back three in these phases, with Zubimendi dropping into the backline, or increasingly with Rice dropping off to the left of the center-backs. Calafiori had attacking freedom on the left, overlapping Eze or inverting into advanced left halfspace positions. So, Arsenal often had their more technically skilled players in deeper positions, while the advanced central positions were often filled by White, Merino, and Calafiori.
A common variation of Arsenal’s buildup structure.
Villa were defending against Arsenal in a compact 4-4-2 shape which was quite effective in many periods of the game. The strikers screened the midfield well, and the central midfielders’ zonal coverage was also smart in restricting the central spaces.
When they dropped the defensive line lower, there was often a slight change on the left side. Rogers would fall deeper and wider to give extra coverage against Saka, meaning Villa went into a temporary 5-3-2 shape with Onana having more space in the midfield line outside him.
The right-sidedness of Arsenal’s attack was a trend in the game, especially going into the second half. Leandro Trossard and Viktor Gyökeres replaced Eze and Merino at half time, and Arsenal’s attack was focused on the right-sided circulation between White, Ødegaard (who moved higher when Arsenal established possession in Villa’s half), and Saka, before looking for far post crosses with the aforementioned Gyökeres and Trossard in the box, plus Calafiori arriving from deeper positions.
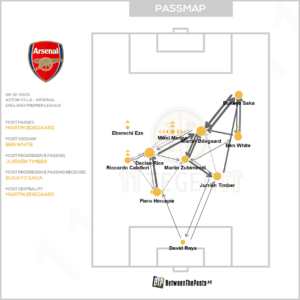
Arsenal’s right-sided focus is evident in their passmap.
Arsenal’s attacking transitions also tended to focus on the right side, with Saka and Ødegaard attacking the spaces left behind by Maatsen when he went forward for Villa. This was seen a few times in the first half, and then crucially in the second, when Arsenal found their equalizer which was scored by Trossard and assisted by Ødegaard running into this right-sided space in transition.
Buendía’s bombshell
After the goal, Villa mostly took the initiative in the game. Emery made some changes in the second half, with Donyell Malen replacing Watkins, before Jadon Sancho and Lamare Bogarde replaced McGinn and Onana.
Villa’s attacking shape was slightly different in the second half. Whereas in the first half they had the 4-2-3-1 with narrow attacking midfielder and attacking fullbacks, the second half saw them go more into a 3-2-4-1 shape when they had established possession in Arsenal’s half.
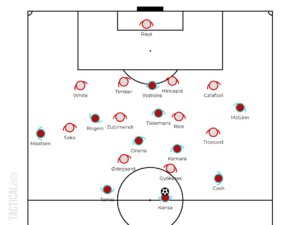
Villa’s second-half possession shape.
Cash would stay closer to the center-backs, while McGinn (later Rogers when he moved to this side after Sancho’s introduction) would stay wider on the right. Once Rogers did move to this side, Cash seemed focused on exploiting the long passes down the line towards him, delivering high passes in behind Calafiori for Rogers to chase.
When Sancho was introduced, he and Maatsen would rotate between taking the wide left and left halfspace attacking roles for Villa. Their attacks were more wing-focused in the second half, whereas the first half had seen them try to thread more passes through central areas against Arsenal’s compact 4-4-2 defensive shape.
Eventually it was another substitute, Emiliano Buendía, who would pop up in the right place to decide the game. In the 95th minute, he was able to pounce on the ball after a scramble in Arsenal’s box and finish emphatically past David Raya to earn Villa the three points.

Takeaways
Villa gave a good account of themselves to continue their winning run here. The game was relatively equal, but there have been few teams able to compete on such level terms with Arsenal this season. Emery’s side are defined by playing in a compact manner with and without the ball, plus their ability to transition well.
The late goal was a heartbreaker for Arsenal, but they could have just as easily walked away with a point here based on their performance. The right-sided dynamics were nice and they created some chances, but defensively they were a bit vulnerable at times, which is something that can rarely be said about this team.


Comments