
Germany – Netherlands: Klopp Crushes Xavi’s Dutch to Seal Top Spot (5-0)
Germany hosted the Netherlands in a thrilling UEFA Nations League clash at a packed stadium. Although the Netherlands entered with high momentum following a dominant run, Jürgen Klopp’s revamped German side delivered a fearless, clinical masterclass that swept their rivals aside. Ultimately, a devastating second-half blitz sealed a comprehensive 5-0 victory, sending Germany to the summit of the group.
Tactical analysis and match report by Aderemi Qoyum.
We decided to make this article free to read. If you want to support our work, consider taking a subscription.
There’s plenty of tactical intrigue between these two top European managers, creating a fascinating modern rivalry matchup between Jürgen Klopp and Xavi. The Netherlands arrived with high confidence, but Germany set out a bold, aggressive strategy to disrupt their rhythm right from the first whistle.
Jürgen Klopp lined Germany up well with Marc Ter Stegen in goal behind a backline consisting of Nathaniel Brown, Jonathan Tah, Nico Schlotterbeck, and Philipp Treu. In the middle, Joshua Kimmich and Aleksandar Pavlović formed the engine room. Up top, Brajan Gruda, Florian Wirtz, and Derry Scherhant supported Kai Havertz up top.
Xavi Hernandez set the Netherlands up in a disciplined 4-2-1-3 shape. Bart Verbruggen was in goal, with a defense of Denzel Dumfries, Jan Paul van Hecke, Micky van de Ven, and Jurriën Timber. The double pivot featured Joey Veerman and Quinten Timber, leaving Tijjani Reijnders to roam centrally behind Cody Gakpo, Crysencio Summerville, and Donyell Malen.
The roaming Reijnders
Before examining Germany’s pressing adjustments, the foundations of the match were laid by Netherlands’ deep buildup against Germany’s initial high press.
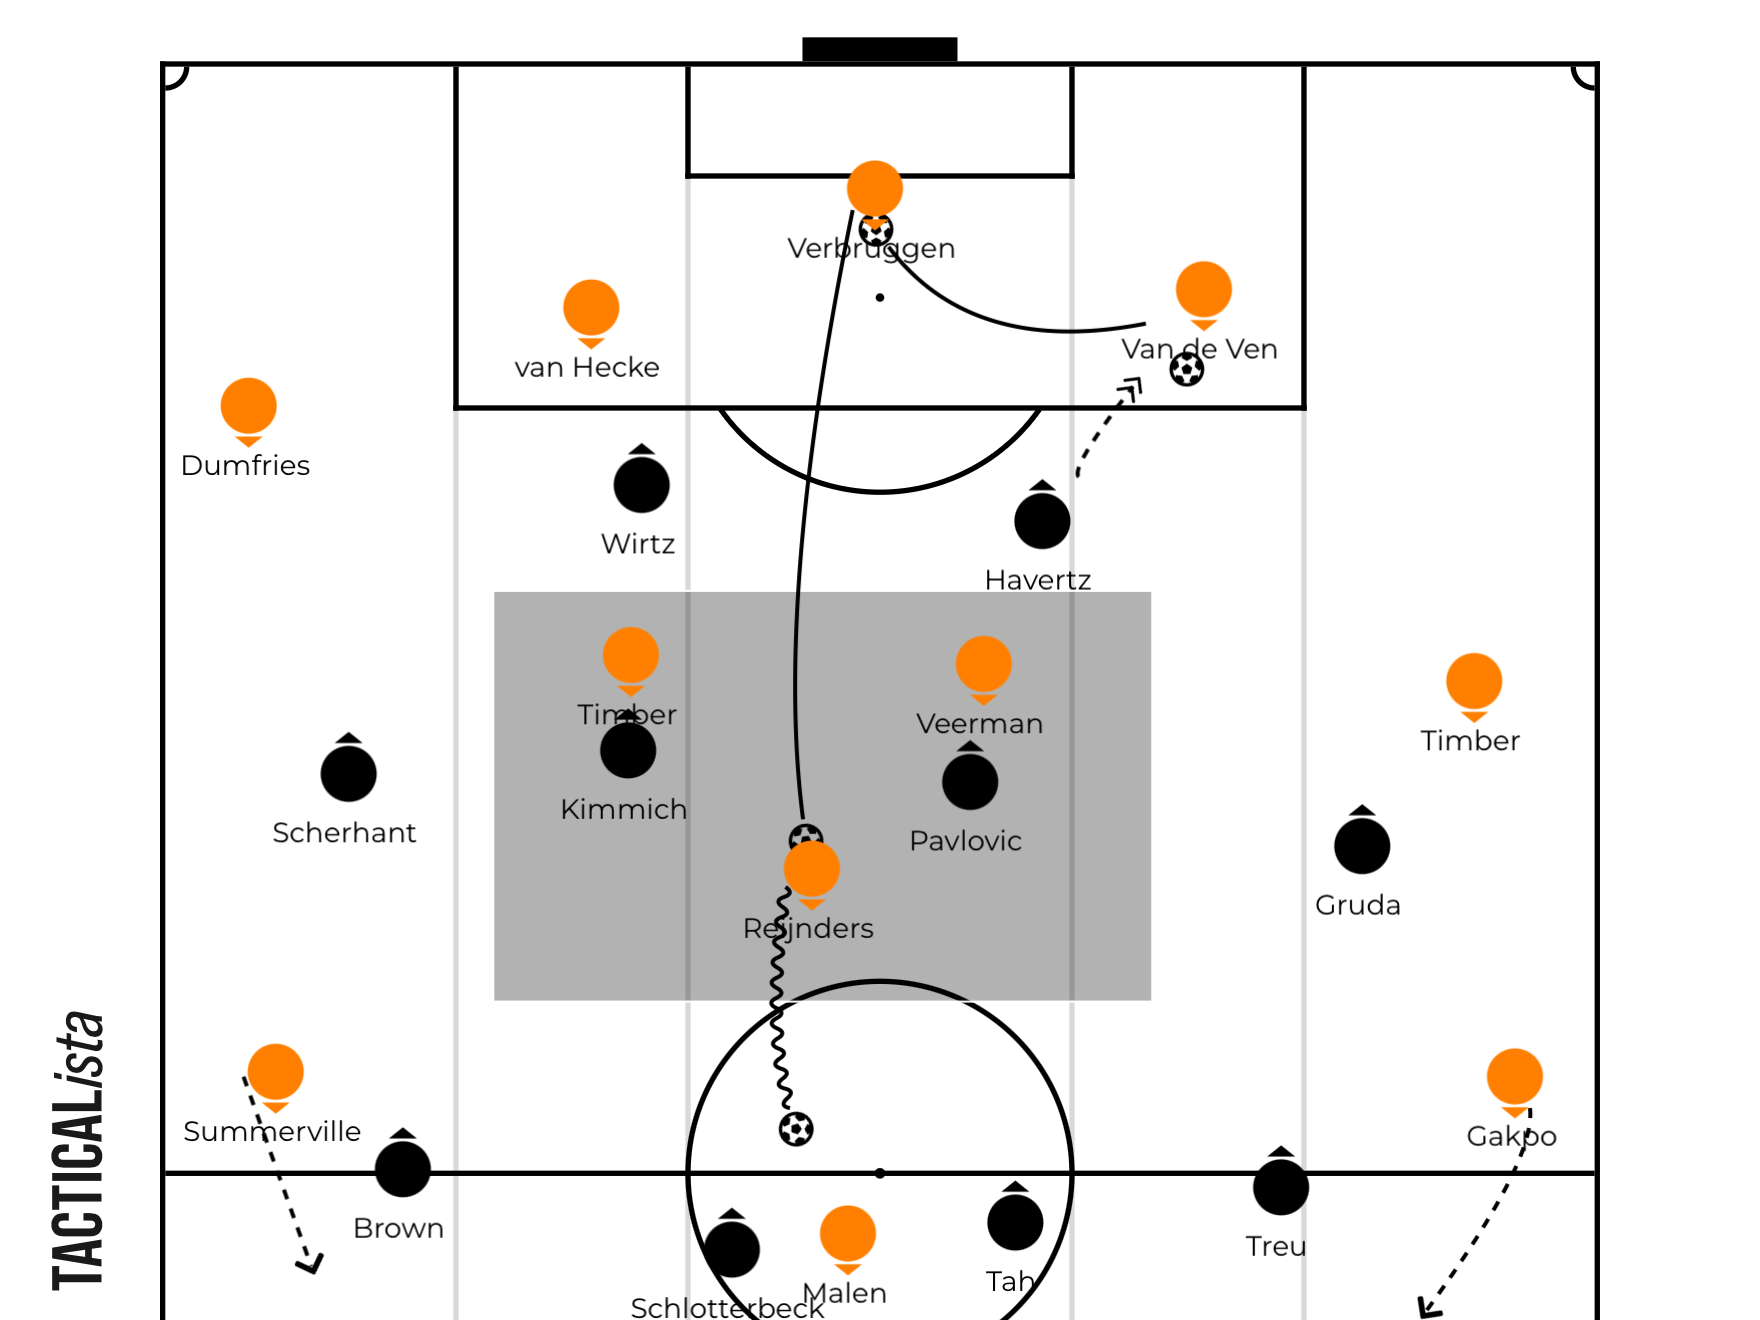
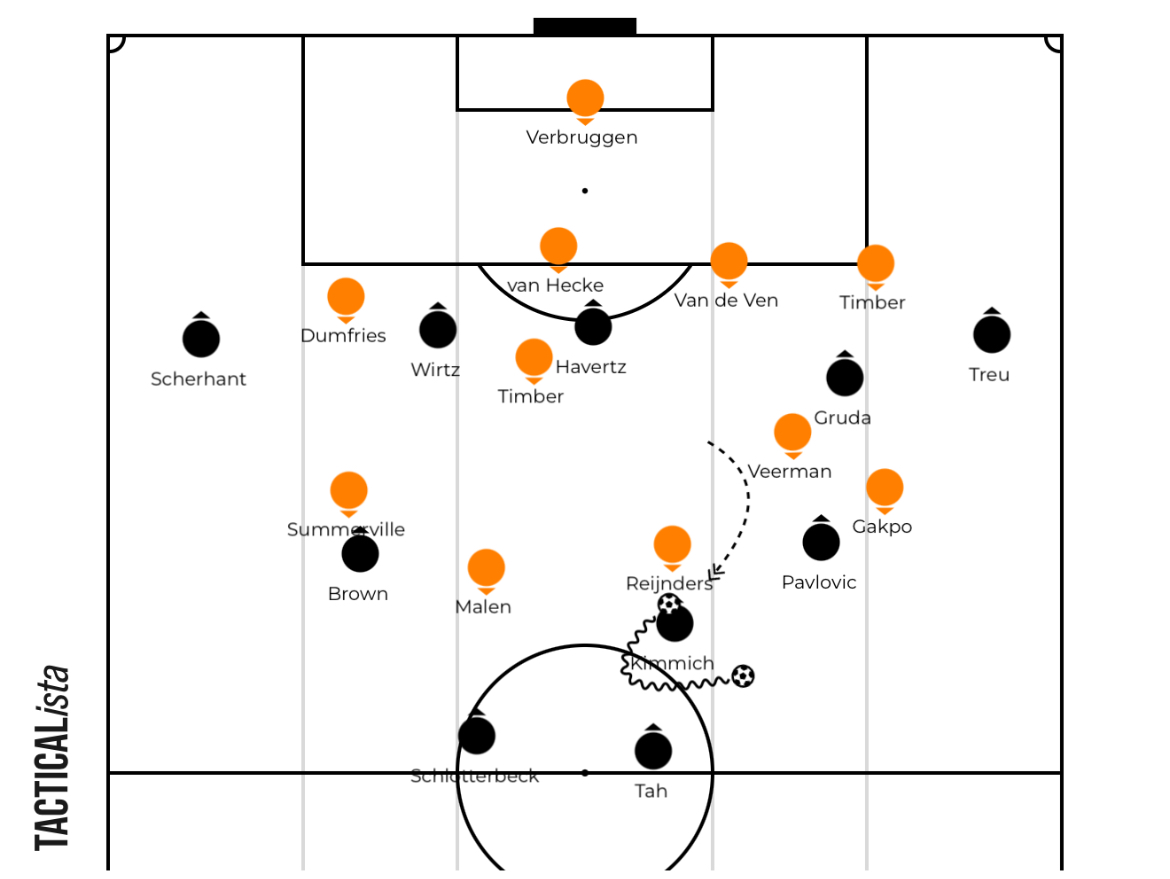
The Netherlands formed a 4-2-1-3 shape during build up with Veerman and Timber making constant counter-movements to receive from Verbruggen or the defenders while Reijnders roams in between the lines to receive progressive passes. Both Gakpo and Summerville remain high and wide while Malen looks to occupy the centrebacks.
In the early stages, when Germany press high and aggressively, they do it in a 4-2-4 shape with both Havertz and Wirtz jumping on Van de Ven and van Hecke while Kimmich and Pavlovic back up the high press behind them on Netherlands’ double pivot.
This aggressive pressure would have been great but this led to Germany having a man down in the midfield as the roaming Reijnders was difficult to track. Tah and Schlotterbeck found it quite impossible to jump on him due to Malen’s intelligent strategies to occupy both centrebacks and they were wary of the Dutchman’s pace in behind. This led to several successful progressions for Netherlands in the early stages of the game as Reijnders was the major outlet centrally.
Minute 14′: Reijnders received in between the lines from his GK, before carrying up the field.
Germany sort a solution
Jürgen Klopp adjusted the press real quick. Germany adopted a more aggressive approach to protect the space between their lines. Instead of Havertz’s pressing position to be high while Gruda was deeper, Klopp now pushed Gruda high while Havertz stayed on Veerman, blocking the passing lane to the deep lying playmaker. This meant Pavlovic could remain deep to stop the roaming Reijnders in between the lines, while also pressing Veerman if Havertz eventually jumps.
This new pressing structure led to Netherlands being forced wide and at times direct. If Netherlands fail to progress centrally as they initially did, they play long to Gakpo on the left or to Dumfries who would have pushed high on the right if he found no space to receive short.
Verbruggen and the centrebacks would go long to both men in the wide areas as they had the physical advantage over Treu and Brown who aren’t the physical profiles. The Netherlands at times found joy in winning the first balls but struggled to win the second, which led to Germany winning possession back.
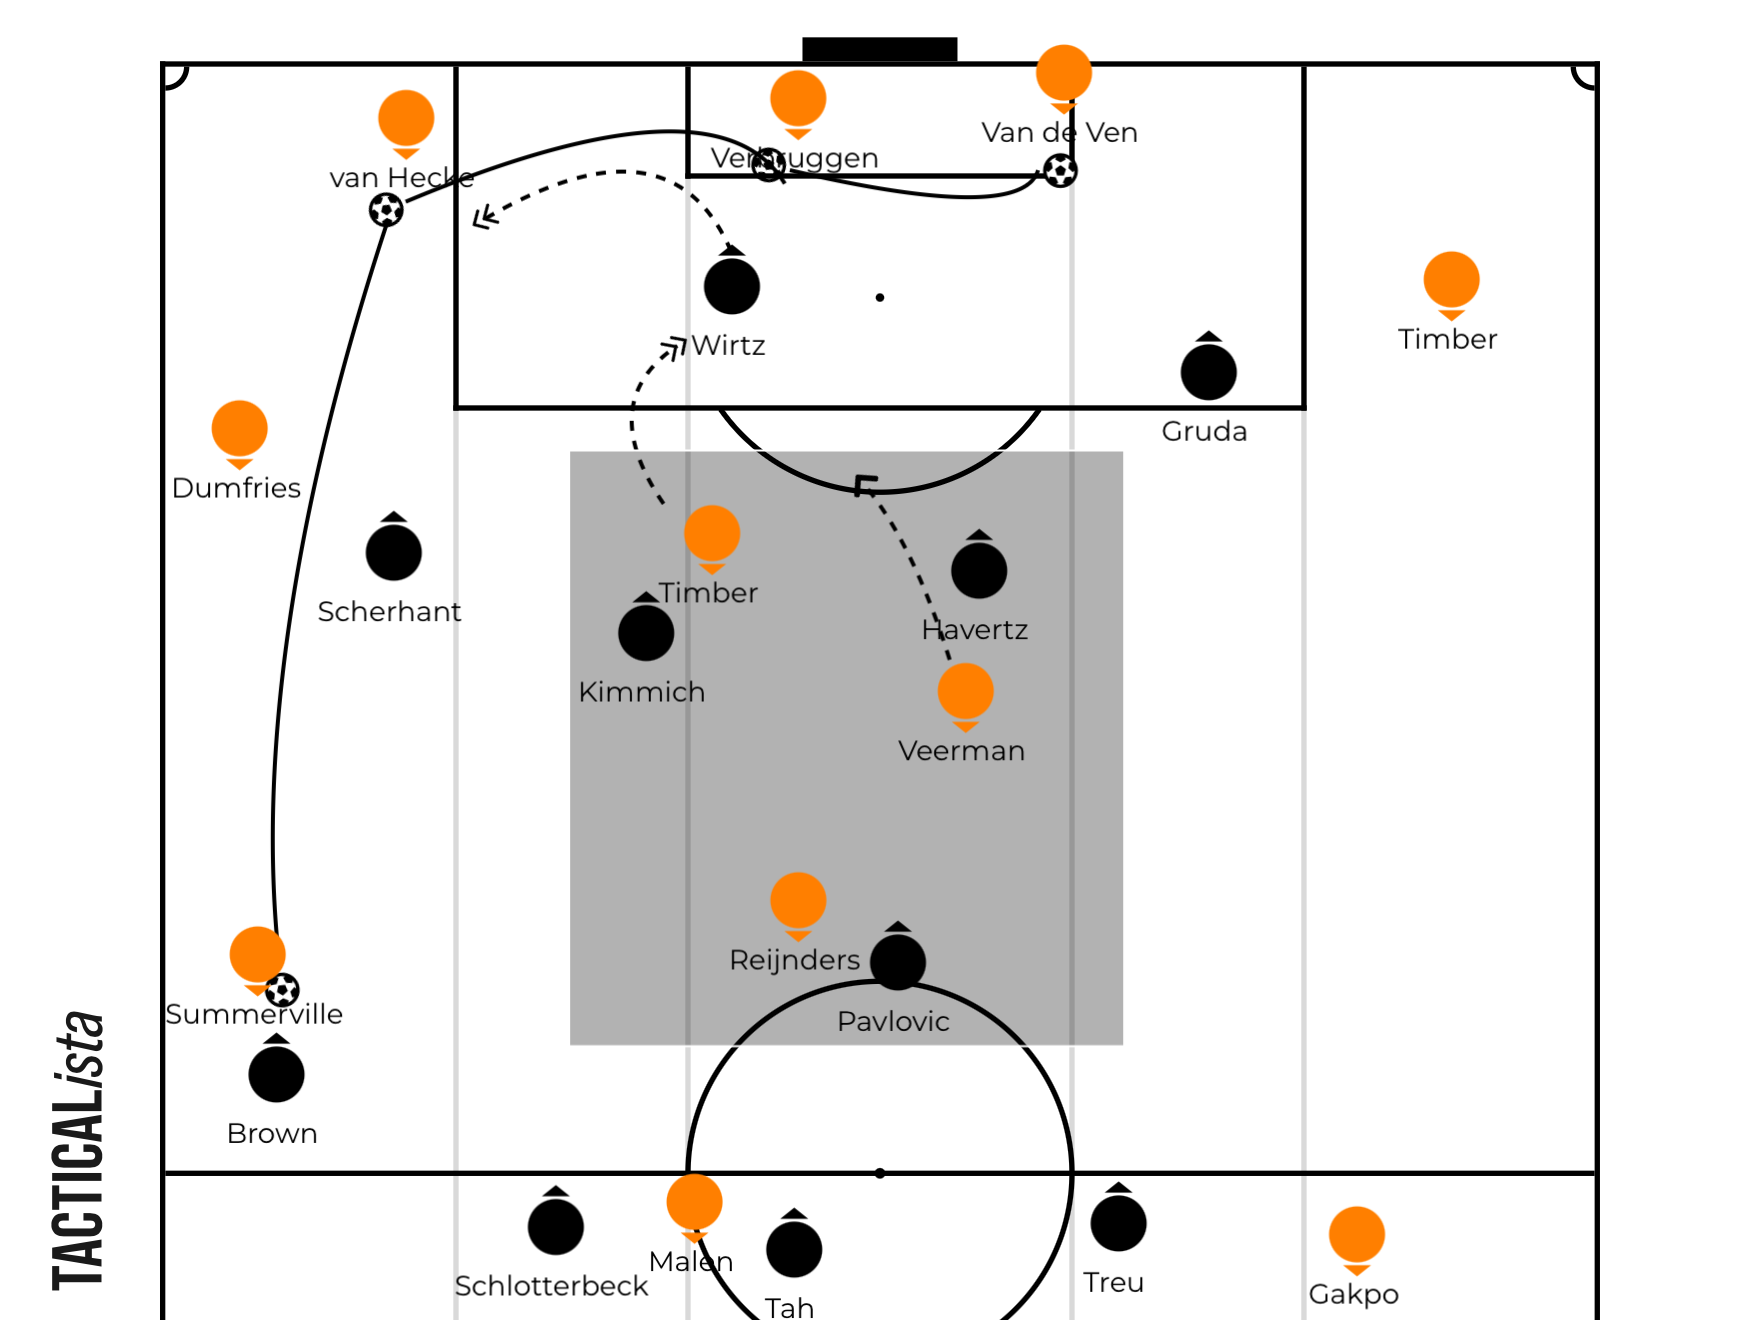
Minute 22′: Germany’s new pressing structure. In an attempt to build short, van Hecke is forced wide by the pressing Wirtz, as the former then plays a forward pass to Summerville who was aggressively pressed by Brown.
Show them who the boss is
When Germany win possession back, they either exploit the spaces vacated with quick attacking transitions or they slow the play down and attack in specific attacking structures.
In settled possession, Germany moved from their 4-2-4 shape in the first phase where Havertz and Wirtz can drop into spaces, to a 3-2-2-3 shape in the middle-third progression phase. This helps to create central overloads and positional connections while both wingers stayed high and wide.
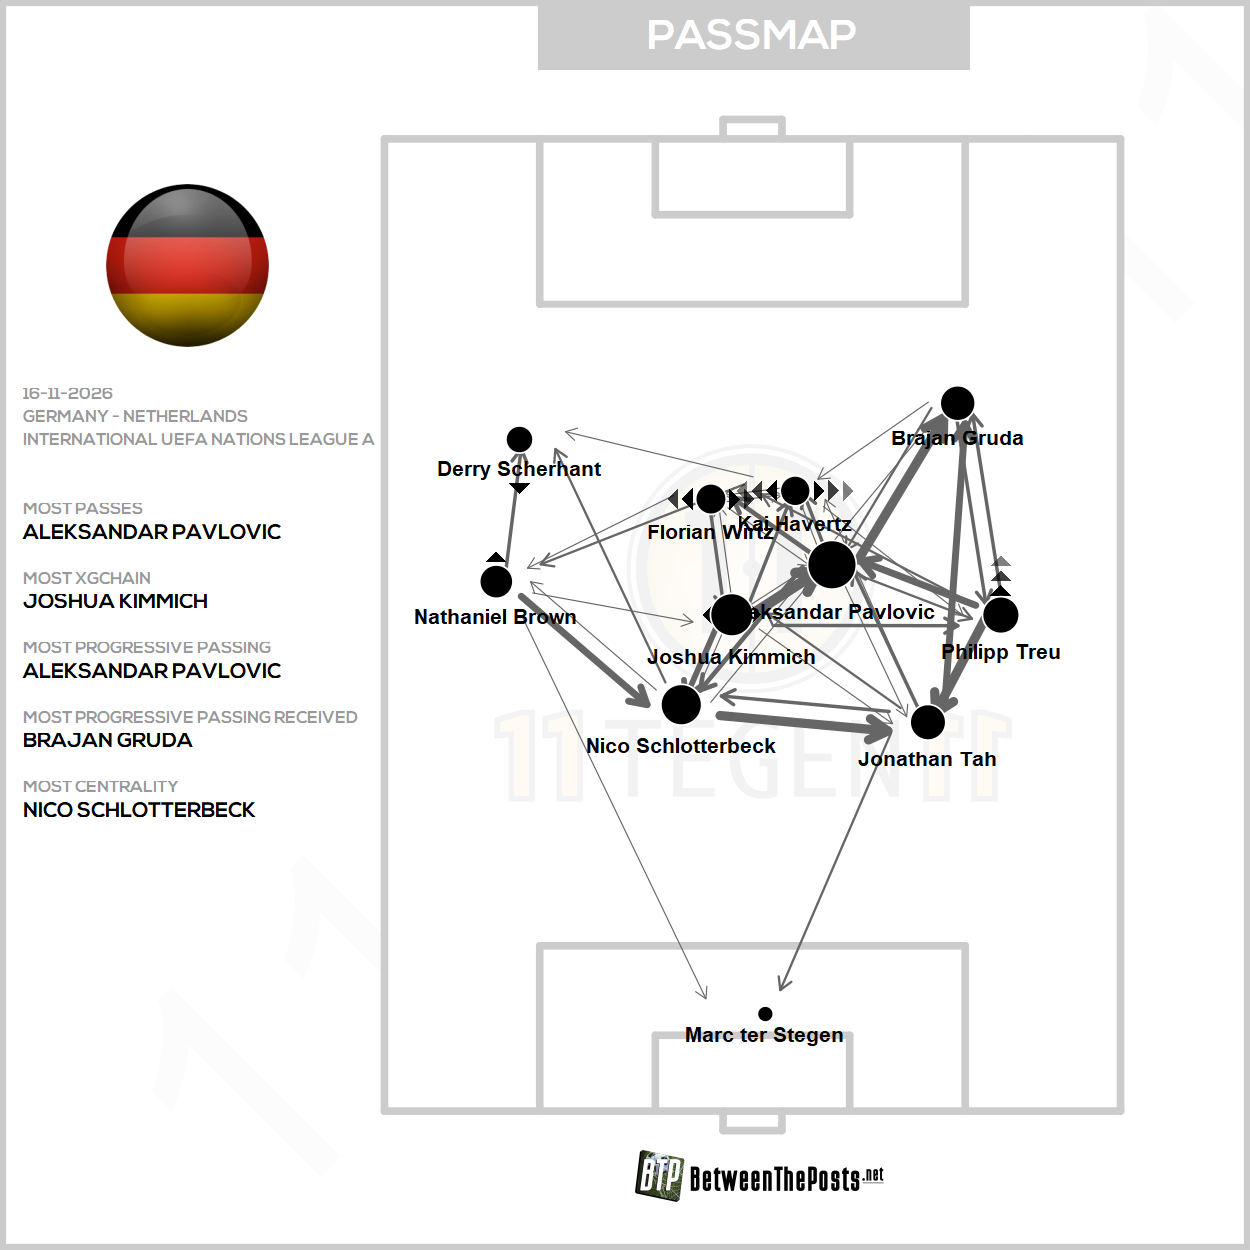
Germany’s Passmap
To create the back three, Brown tucks in alongside the centrebacks. The midfield four is formed by the double pivot, Treu who pushed into the right half-space and Wirtz who roamed on the left. This created a 4v3 central overload. With these, Germany maintained a compact connected structure, ensuring close passing options.
Netherlands defended initially with a 4-4-2 shape with Reijnders and Malen leading the line, however, the positioning of Treu dragged Gakpo deeper and away from the frontline, as Gakpo tried to balance the midfield underload. Veerman pushed high up on Pavlovic while Timber was tasked to cover the big spaces in between the lines against Florian Wirtz.
Germany opened the scoring just before half-time after winning possession back in their half and quickly exploiting the spaces left vacant by the Dutch. Kimmich found Scherhant on the left, where the winger faced Dumfries in a 1v1 before cutting inside and firing a superb finish into the top corner for his first international goal and celebrating his return to familiar ground.
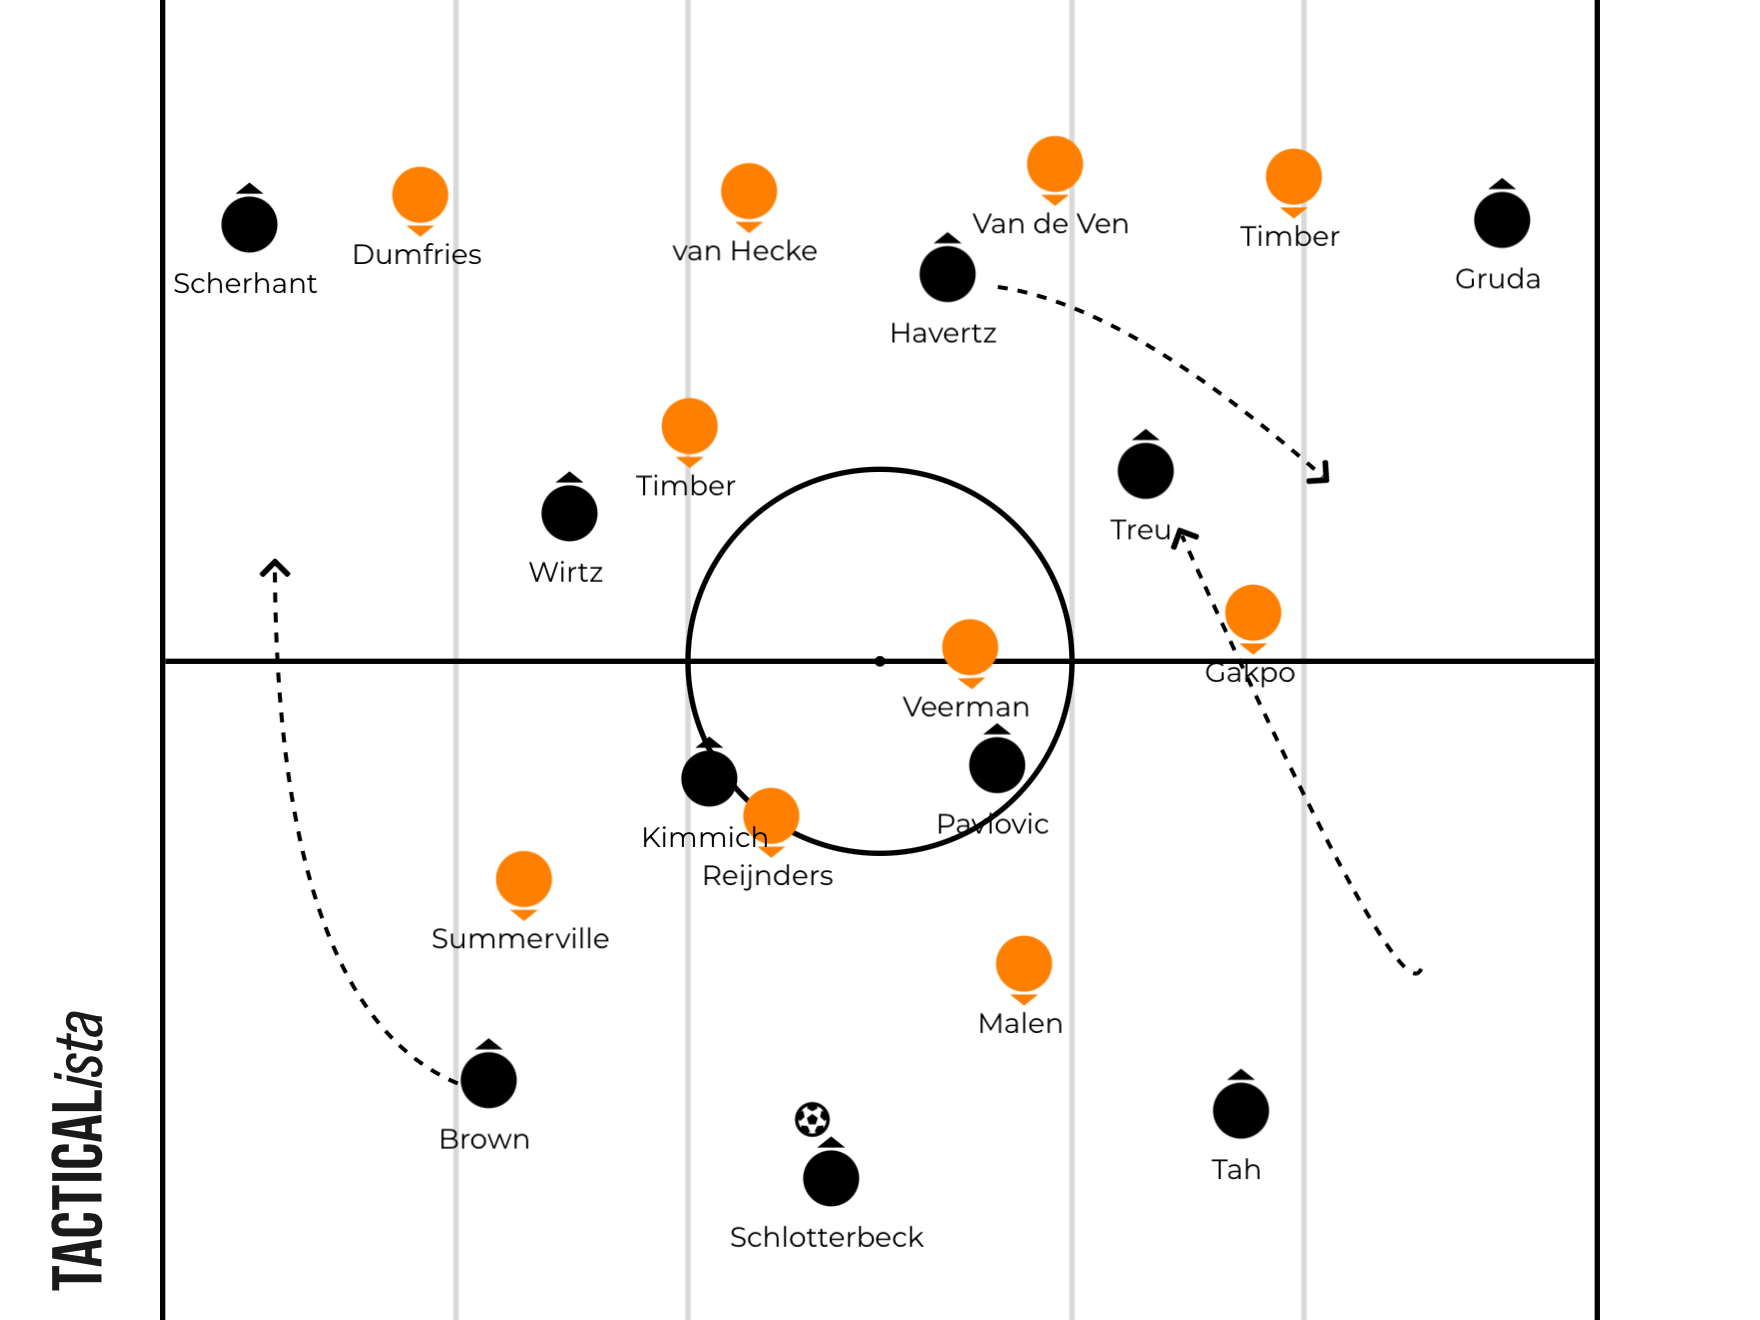
Minute 27′: Germany’s shape in their middle-third progression phase against Netherlands’ mid-block shape.
Second-half onslaught
As Germany advanced into the final third, their attacking structure evolved into a 3-1-6 shape with Pavlovic or Brown joining the front line and the attacking players in between the line. Germany also formed a solid rest-defence to stop any possible transitions against the quick attackers of Netherlands.
In the second half, the game changed entirely in Germany’s favour. As the majority of the first half had sequences of Germany’s press against Netherlands build-up, defensively, Germany improved far better in the second half. Their pressing shape became more aggressive and man-oriented to protect every possible space Netherlands looked to exploit.
Whenever the front line pressed the Dutchmen, they were well backed up by Kimmich and Pavlovic while one of Schlotterbeck or Tah pushed into midfield or covered the fullbacks if they pushed on the side, while the other center-back provided cover against Malen. This super-aggressive second half approach disrupted the Netherlands’ central progression and created opportunities to regain possession and launch quick attacking transitions in Germany’s favour.
Minute 52′: Germany in the final third trying to keep pressure on the Netherlands’ backline. Germany always have a solid rest-defence to stop Netherlands from threatening in transition.
Germany took complete control of the second half, scoring three times in 11 minutes through Wirtz’s brace in between Schlotterbeck’s header from Gruda’s free kick. Gruda, who had already registered two assists, later added a goal of his own in the 78th minute to cap an emphatic performance and secure Germany top spot with 11 points, prompting some Dutch supporters to leave early.
Takeaways
After a slow start to Klopp’s reign, his young side finished the group stage with consecutive wins. Germany produced the required result to move from the brink of elimination to finishing as group leaders.
For the Netherlands, they suffered a heavy defeat just days after their emphatic 7-0 victory over Greece. It was Xavi’s first loss since taking charge, although his side still secured second place and qualification for the quarter-finals ahead of Greece on head-to-head record.