

Switzerland – Bosnia and Herzegovina: Late Swiss Surge Turns Tight Contest Into Emphatic Victory (4-1)
Switzerland secured a commanding 4-1 victory over Bosnia and Herzegovina in their second 2026 FIFA World Cup Group B fixture, with Johan Manzambi scoring twice after coming off the bench, while Ruben Vargas and Granit Xhaka also found the net. Although the final score suggests a comfortable Swiss win, the match remained finely balanced for much of the evening before a dramatic late collapse from Bosnia allowed Switzerland to pull away in the closing stages.
Tactical analysis and match report by Mustafa Hassan
Switzerland entered their second Group B fixture looking to build on the point they earned against Qatar in the opening round. Murat Yakin’s side arrived at the tournament carrying a reputation for consistency on the international stage, having reached the knockout rounds in each of the last three World Cups. With Canada collecting a convincing victory earlier in the group, the Swiss knew that three points would place them in a strong position ahead of a decisive final-day meeting between the two sides.
Meanwhile, Bosnia and Herzegovina were seeking to take another step towards a historic qualification for the knockout stages. Their World Cup campaign had begun with a creditable draw against Canada, extending the belief that Sergej Barbarez’s side could compete with more established opposition. Switzerland represented a significant challenge, and Bosnia knew that avoiding defeat would leave their fate firmly in their own hands heading into the final group match.
Yakin retained the 4-3-3 structure that had been used against Qatar. Gregor Kobel started behind a defensive line of Silvan Widmer, Nico Elvedi, Manuel Akanji and Ricardo Rodríguez. Remo Freuler and Michel Aebischer joined Granit Xhaka in midfield, while Dan Ndoye and Fabian Rieder supported Breel Embolo in attack.
Barbarez selected a 4-4-2 formation for Bosnia and Herzegovina. Nikola Vasilj started in goal behind Amar Dedić, Nihad Katić, Tarik Muharemović and Sead Kolašinac. Benjamin Tahirović partnered Ivan Šunjić in central midfield, while Amar Memić and Kerim Alajbegović occupied the wide positions. Edin Džeko and Ermedin Demirović led the line.
Switzerland’s Left-Sided Overloads
Switzerland’s control of possession was built around a clear asymmetry. Although Yakin nominally used a 4-3-3, the structure frequently resembled a 2-2-5 during settled attacks. Manuel Akanji and Nico Elvedi remained as the first line of circulation, while Granit Xhaka and Remo Freuler formed a double pivot that consistently drifted towards the left side of the pitch. This movement created a stable platform for progression and allowed the Swiss to dictate the tempo through short combinations rather than direct vertical play.
The opposite side was intentionally stretched. Silvan Widmer held a very high and wide position on the right touchline, pinning Bosnia’s left midfielder and preventing the defensive block from shifting too aggressively towards the ball. Ricardo Rodríguez mirrored that width on the left, but unlike Widmer he combined closely with the interior players. The resulting triangle between Rodríguez, Akanji and the left-sided pivot generated repeated overloads against Bosnia’s right flank.
Dan Ndoye was the key beneficiary. Starting from a wide position, he initially fixed Amar Dedić near the touchline before timing inward movements into the left half-space. As Xhaka and Freuler circulated possession towards the overloaded side, Bosnia’s midfield line was gradually drawn across the pitch. Once the passing lane opened, either Xhaka or Freuler threaded a vertical pass into Ndoye’s feet between the lines.
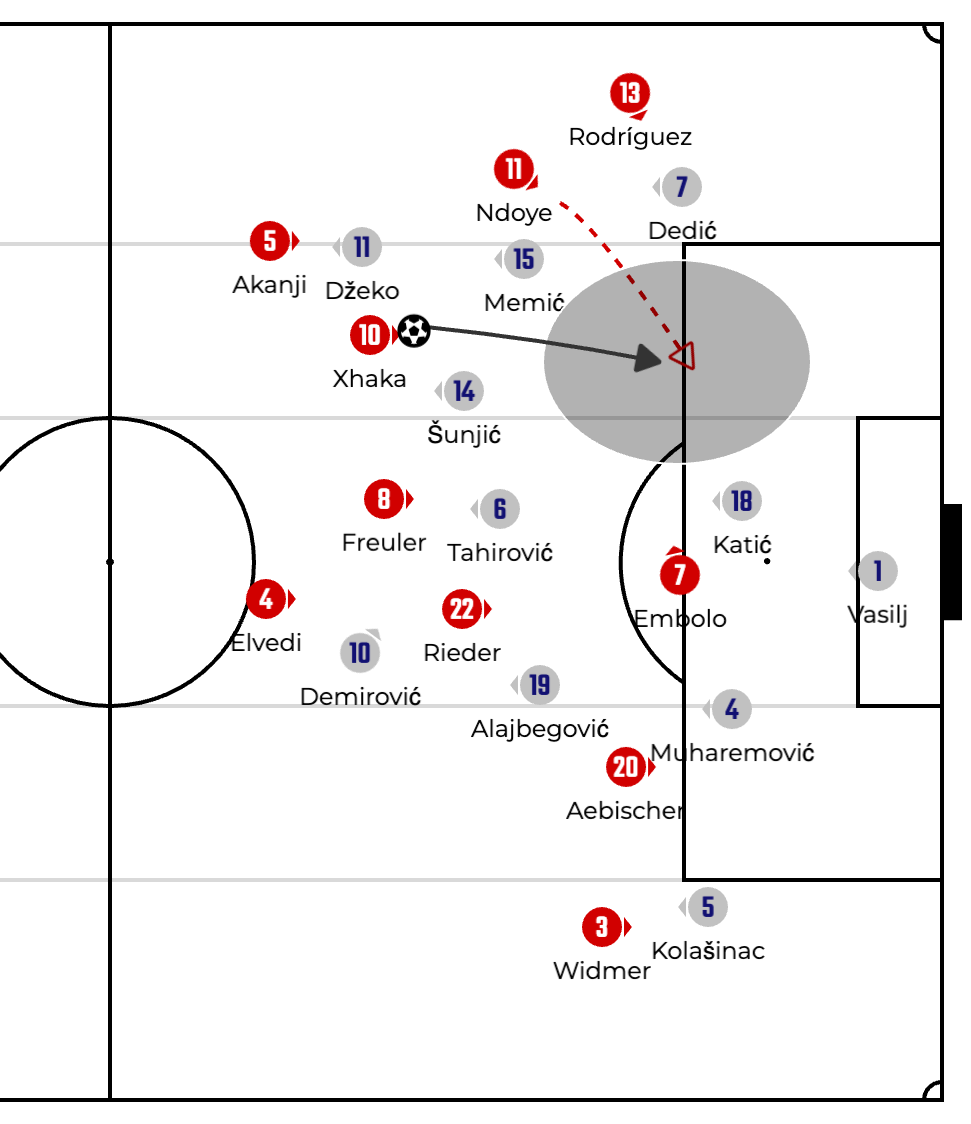
Switzerland’s structured left-side overloads: Xhaka and Freuler drifting across to create a 2-2-5 build-up, isolating Ndoye between the lines as the key vertical outlet into the final third.
These pocket receptions became Switzerland’s main route into the final third. Ndoye could turn towards goal, combine with Embolo, or release Rodríguez on the overlap, allowing the Swiss to transform patient possession into controlled penetration through the left interior channel.
Bosnia’s Wide Progression
Bosnia and Herzegovina’s main attacking mechanism in possession was built around deliberate wide progression and structured third-man combinations, particularly on the left flank. Rather than circulating through central congestion, Sergej Barbarez’s side frequently sought to advance the ball through wider channels, using Sead Kolašinac as an aggressive stabiliser in advanced wide zones. Kolašinac consistently stepped up to the extreme touchline, effectively acting as an auxiliary outlet in build-up and progression phases. His role was not merely to support circulation, but to secure vertical access into higher areas of the pitch by offering a safe passing lane in the wide corridor.
From these wide connections, Amar Alajbegović became the primary ball carrier between phases. Receiving in deeper or intermediate wide zones, he advanced the ball at a controlled tempo, often slowing progression intentionally to wait for supporting structures to form. His decision-making was shaped by the timing of Benjamin Tahirović’s movements, as the midfielder consistently pushed up from central areas into the left half-space to establish a progressive link between midfield and attack. This created a layered structure where Bosnia could stabilize possession wide before re-orienting play inward.
The key dynamic emerged with Ermedin Demirović’s third-man runs. As Alajbegović held possession and Tahirović occupied advanced interior lanes, Demirović would attack the space behind the defensive line, exploiting the attention drawn by wide overloads and midfield rotations.
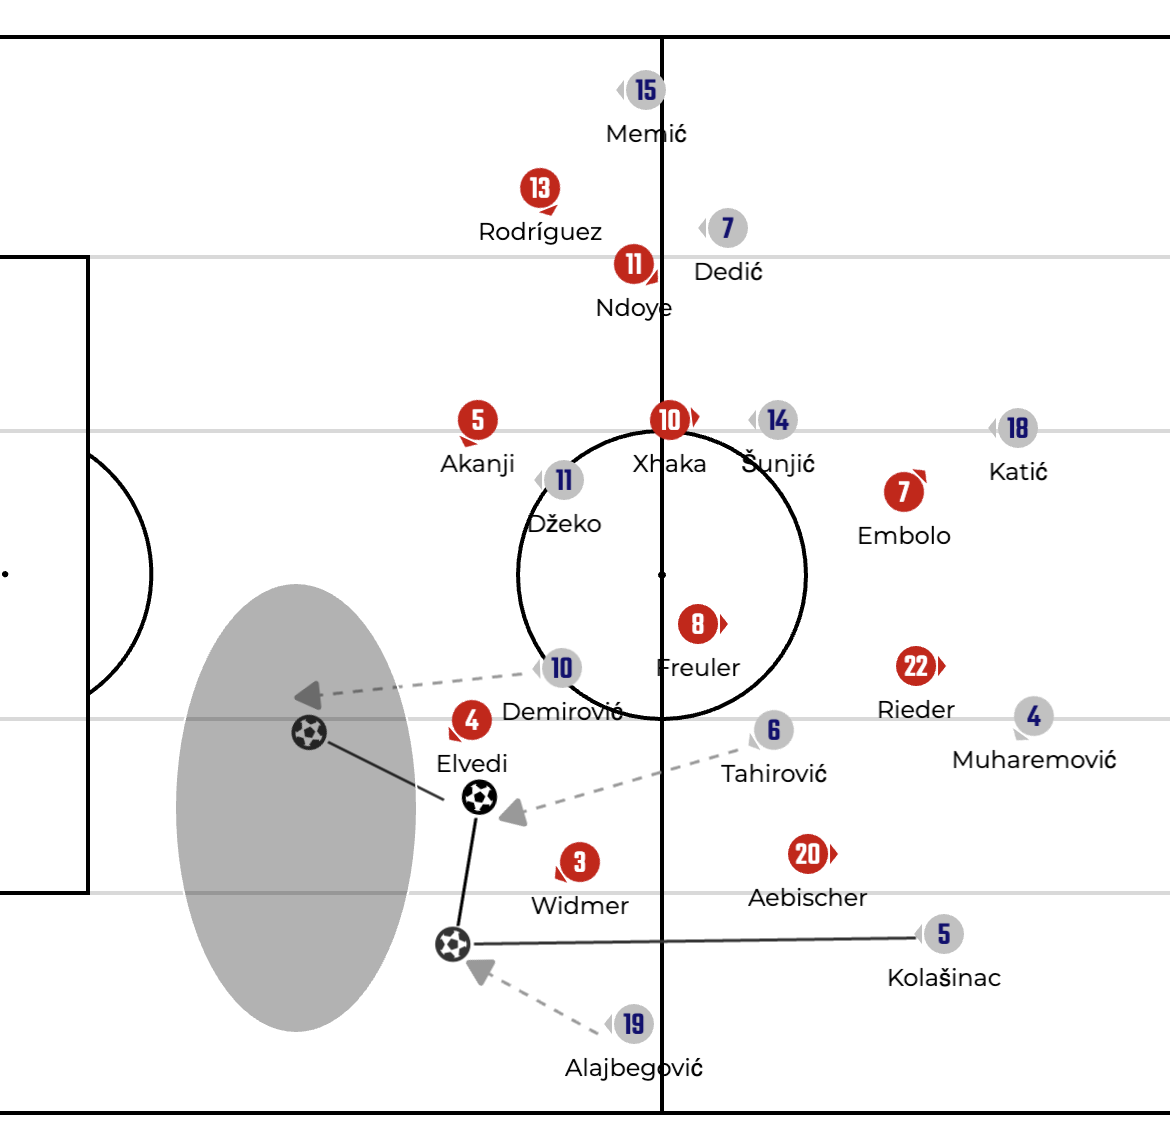
Bosnia’s wide progression chain: Kolašinac stretching the flank, Alajbegović carrying possession, Tahirović connecting in the left half-space, and Demirović attacking depth through timed third-man runs behind Switzerland’s defensive line.
These coordinated movements repeatedly disrupted Switzerland’s defensive balance, particularly when the Swiss back line was drawn toward the ball side. Bosnia managed to progress into dangerous attacking zones multiple times through this sequence, even if the final execution occasionally lacked precision.
Manzambi Exploiting Central Space
Switzerland’s decisive attacking threat in the final stages stemmed from their ability to manipulate Bosnia and Herzegovina’s defensive shape and exploit the central spaces that emerged as a consequence of wide-oriented movements. The introduction of Johan Manzambi in the 71st minute proved particularly influential in this regard. While Switzerland had already been stretching Bosnia horizontally through their positional structure, Manzambi added a new dimension by consistently identifying and attacking the vacant zones that appeared in the centre of the pitch whenever Bosnia’s defensive block shifted towards the flanks.
The Swiss positional rotations frequently drew Bosnia’s midfield and defensive units towards the ball side, especially when possession was circulated through the wide channels. As players moved outward to create width and overloads, gaps naturally opened between the Bosnian centre-backs and midfield line. Manzambi’s role was not to remain fixed between the lines, but to time his movements into these newly created spaces, providing a progressive option capable of receiving on the turn and immediately threatening the defensive structure.
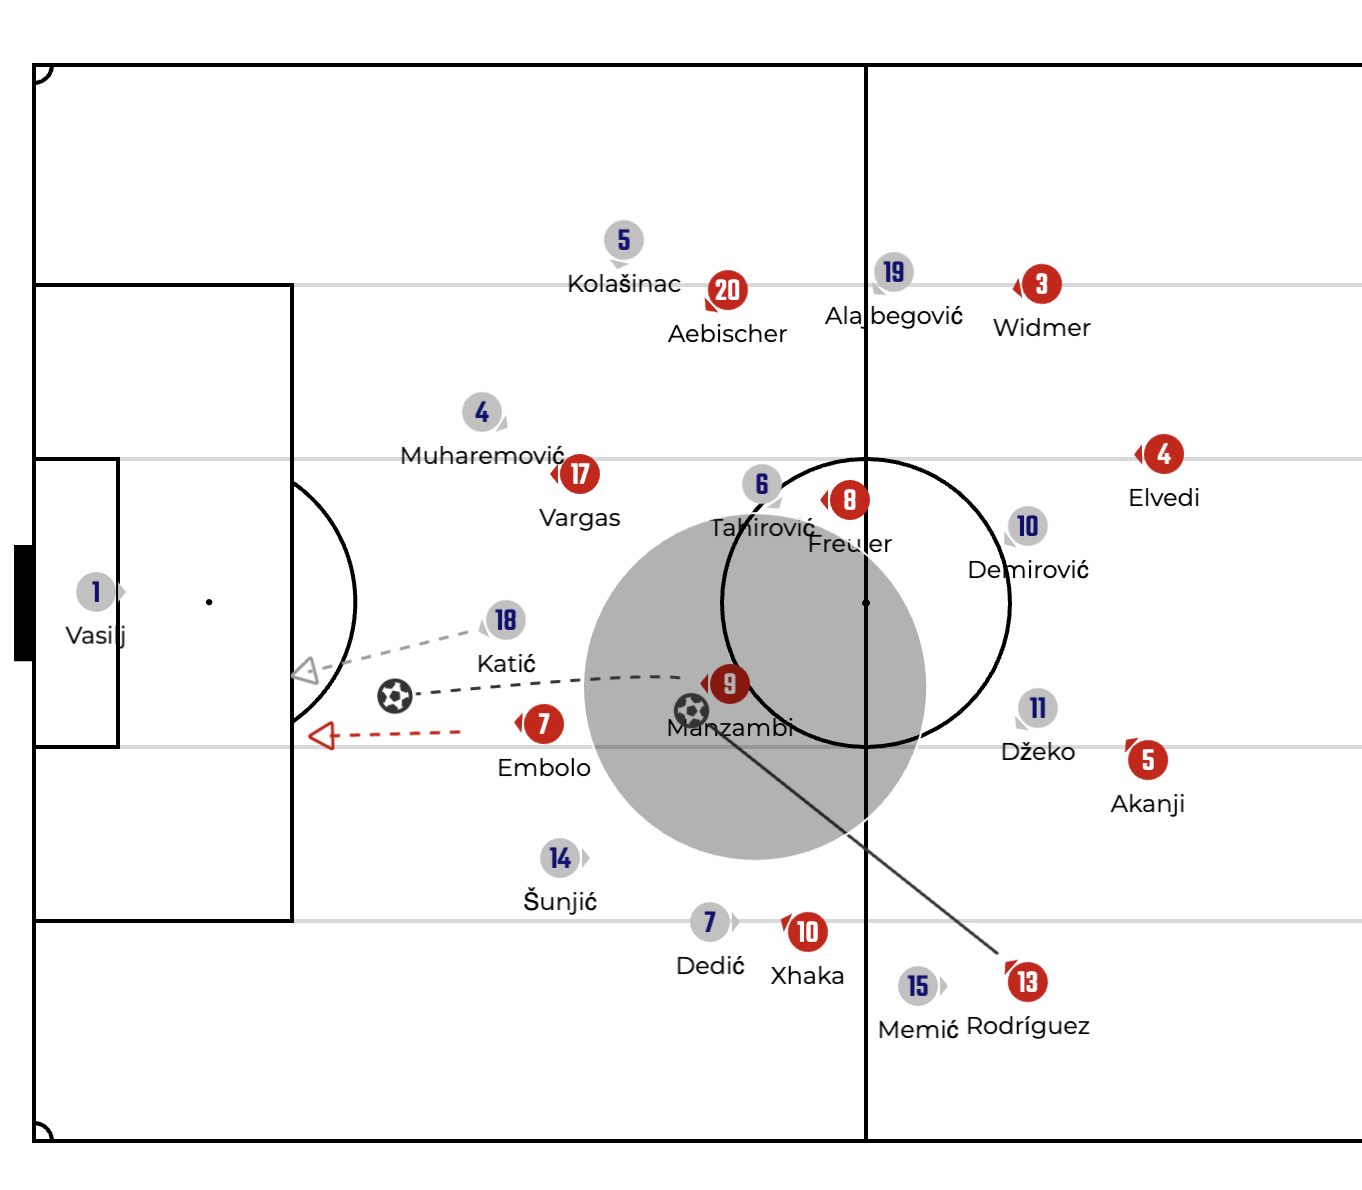
Manzambi attacking the central space created by Switzerland’s wide movements, receiving between the lines before exploiting the gap behind Bosnia’s defence in the sequence that led to Muharemović’s red card.
This pattern was perfectly illustrated in the sequence that led to Tarik Muharemović’s dismissal. The move originated with Switzerland finding Manzambi in a central pocket that had opened due to Bosnia’s lateral shifting. Receiving in space, he was able to turn and accelerate the attack before a penetrating pass was played into the area behind the defensive line. As Embolo threatened to break through on goal, Muharemović was forced into a desperate foul, resulting in a red card. The incident highlighted how Switzerland’s spatial manipulation repeatedly generated access to dangerous central zones, with Manzambi becoming the primary beneficiary and executor of those opportunities.
Takeaways
Switzerland controlled possession through left-sided overloads, with Xhaka and Freuler drifting across to create numerical superiority and consistently find Ndoye between the lines.
Bosnia’s most effective attacking sequences came from wide progression on the left flank, where Kolašinac, Alajbegović and Tahirović combined to free Demirović for third-man runs beyond the Swiss defence.
The turning point arrived after Manzambi’s introduction. His intelligent occupation of central spaces exposed gaps created by Bosnia’s lateral defensive shifts, leading directly to Muharemović’s red card and helping Switzerland turn a balanced contest into a convincing victory.


Comments